You are here: 1. Distribution System > 1.7. DEBTORS Menu: Debtors Ledger > 1.7.5. Debtors - Hold Debtors

Debtors - Hold Debtors

Debtors can be placed on hold in two ways:

You use this batch process to place on hold all debtors whose balance has been overdue for the period of time that you select.


Technical Tip

  • Accounts can be taken off hold during the receipt of debtor payments or in the Debtor master file.
  • Only users with the appropriate security access can process new sales to a debtor that is on hold (i.e. the Override Customers On Hold field on the User File Update screen - MDS Security tab must be set to Yes - refer to "Maintenance - Edit UserIDs - 4. MDS Security").
  1. Select DEBTORS |  HOLD DEBTORS.

Micronet displays the Hold Debtors screen.

  1. Complete the following fields:


Field

Value


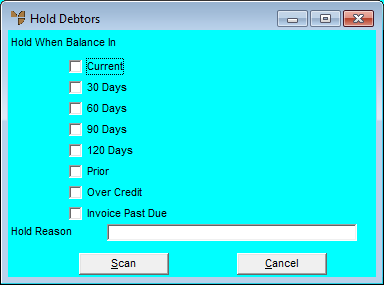
Hold When Balance In

Select the period from which you want Micronet to check to see whether a debtor should be placed on hold. For example, by selecting 90 days, Micronet checks the 90 to Prior periods to seek out those debtors and then place their accounts on hold.

Options are:

  • Current - check for debtors whose balance is overdue in the current GL period
  • 30 Days - check for debtors whose balance was overdue the previous GL period
  • 60 Days - check for debtors whose balance was overdue two GL periods ago
  • 90 Days - check for debtors whose balance was overdue three GL periods ago
  • 120 Days - check for debtors whose balance was overdue four GL periods ago
  • Prior - check for debtors whose balance was overdue more than four GL periods ago
  • Over Credit - check for debtors that are also over their credit limit.
  • Invoice Past Due - check for debtors that also have an invoice that is past its due date.


Hold Reason

Enter the text you want to appear next to your customer’s account during inquiries or when orders are being processed for your operators to see.

  1. Select the Scan button.

Micronet displays the Select Debtors to Hold screen. By default, all debtors matching your selections will be placed on hold (as indicated by Yes in the Hold column).

  1. Use the following options to decide whether individual debtors should be placed on hold and to flag / unflag debtors to be placed on hold:


Option

Action


Hold Selected

If debtors have been flagged not to be placed on hold, use the Shift and/or Ctrl keys on the keyboard to re-select those debtors then select the Hold Selected button to flag them to be held. Micronet displays Yes in the Hold column for those debtors.


Clear Selected

Use the Shift and/or Ctrl keys to select any debtors you do not want to place on hold then select the Clear Selected button to unflag those debtors. Micronet displays No in the Hold column for those debtors.


Verify

  • Print the accounts of all debtors flagged to be placed on hold. You can check this report before running the program to place the debtors on hold.
  •  

    Inquiry

    Inquire on a selected debtor, e.g. on the debtor's account. When you select this button, Micronet displays the Debtor Inquiry screen providing you with full debtor inquiry options. For more information, refer to "Displaying the Debtor Inquiry Screen".

      Show All Debtors Check this box to display a full list of debtors, including those not found by your initial search.
    1. Select the Process button to place on hold all debtors who have Yes displayed against them in the Hold column.

    Micronet displays the Select Output Device screen so you can print the list of debtors who have been placed on hold.

    1. Select whether you want the report displayed on screen, printed, saved to a specific type of file, faxed, or emailed in a specific format.


    Reference

    For more details on these options, refer to "Selecting the Output for Inquiries and Reports".

    Micronet prints or displays the Debtors Hold Report.